
With your home Linux server set up, you have established the possibility to log in to your home server from another computer via ssh. If you have opened port forwarding on your home router, for ssh port towards your home Linux server, then you can log in from outside world, i.e. from anywhere on the internet.
This resource offers additional possibilities, one of which is a proxy server, very secure and very reliable, which you can use when you are abroad and you don’t want to be tracked.

“You” means:
- you and your laptop which is connected to some public WiFi, or
- you and your workstation computer at work, or
- you and your android phone with any kind of internet connectivity.
“You” also means “only you”, i.e. usage of such proxy server is restricted to those who have username/password on your home Linux server, as well as the knowledge of your home server’s IP address/domain name and ssh port.
Unprotected
Default (unprotected) layout would look something like one of the two diagrams below:
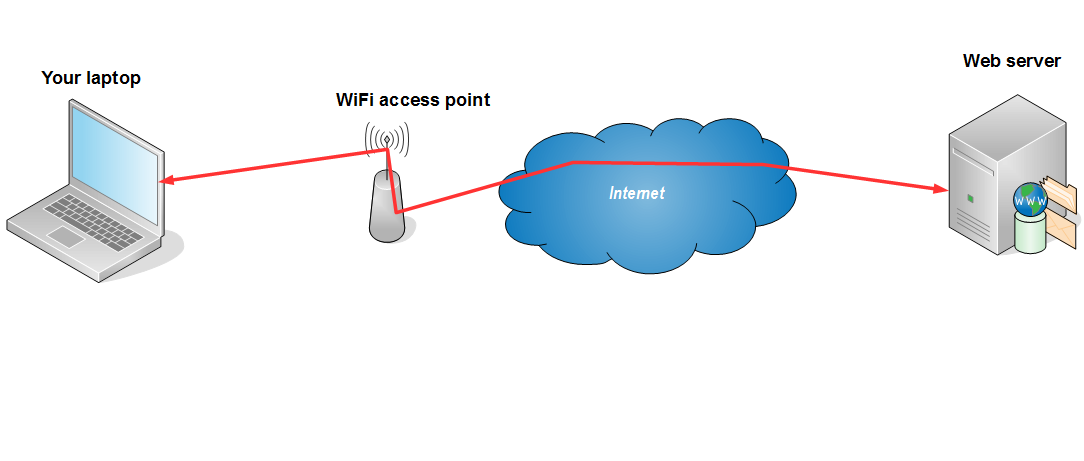
Public WiFi hotspot
Company network
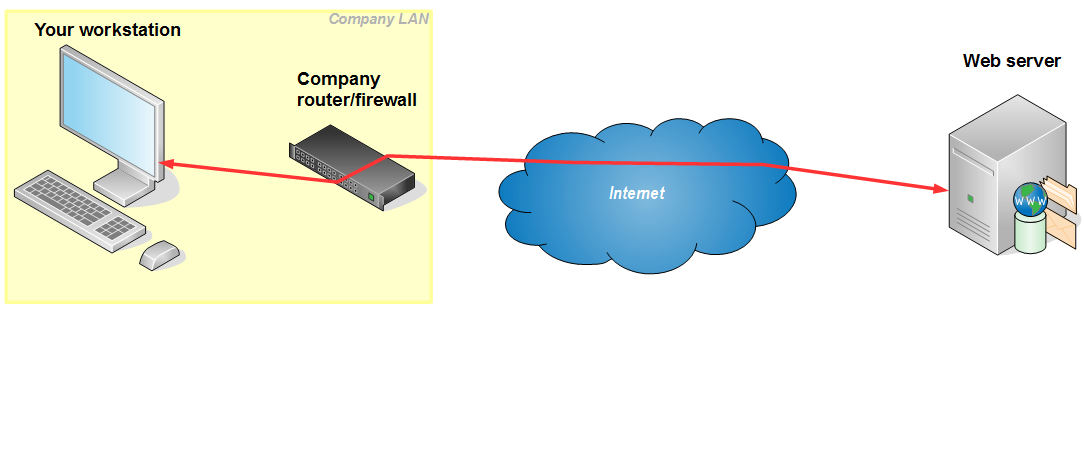
Both layouts have the possibility of keeping the record of, for example, the web pages you are visiting via your browser. On a publicly available hotspot logging may occur at WiFi access point or some additional equipment attached to it. Also, if wireless transport goes unencrypted – any computer in the area of the hotspot may spy on you. On your company network logging usually occurrs on router/proxy/firewall equipment. All web traffic that goes through this equipment may be logged, with the workstation address attached to each request, so your network administrators (and consequently – your boss) may have the list of the web pages you are visiting from your workstation. Also, some sites (most ofthen Youtube, Facebook and such) may be blocked by this network equipment.
Protected
The layout that we are able to establish with SOCKS proxy, via home Linux server, is as follows:
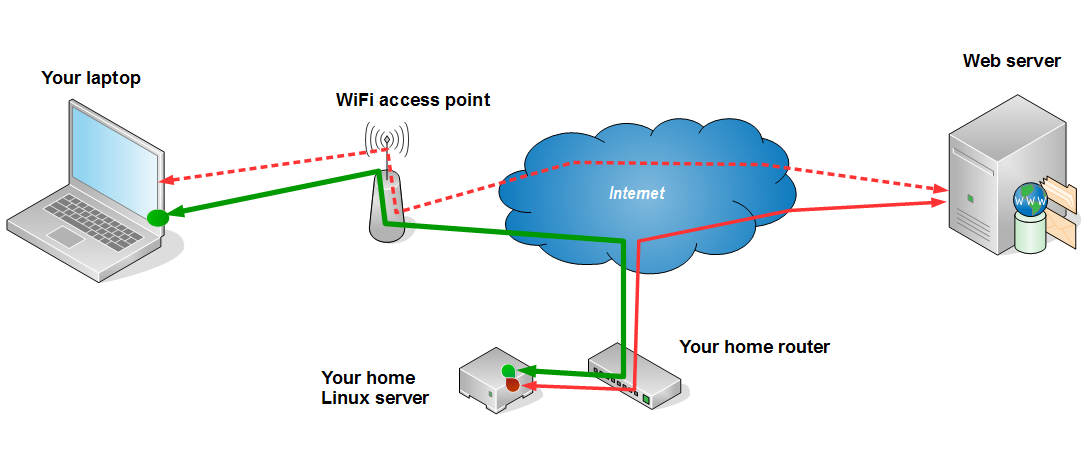
Public WiFi hotspot
Company network
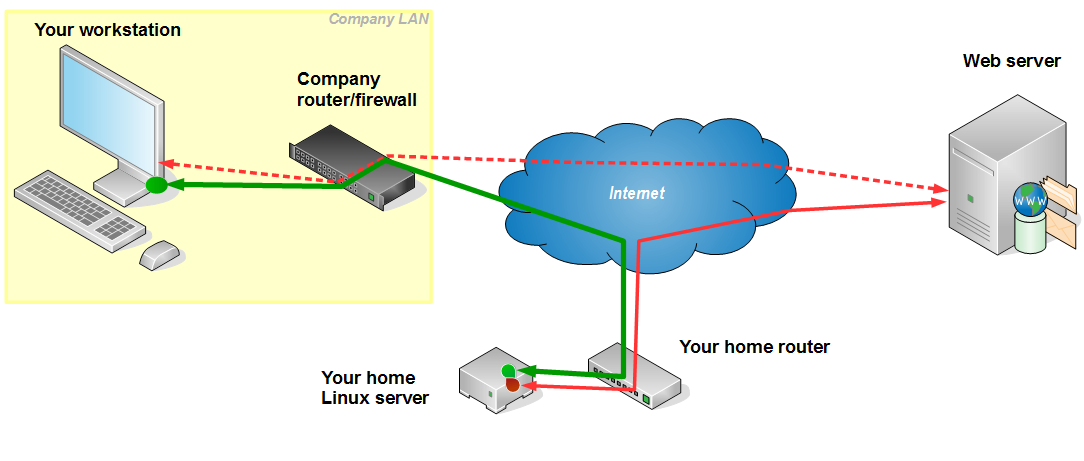
As shown on the layouts above, an encrypted ssh tunnel is established from your home Linux server to your laptop or workstation. Entry point to this tunnel (green dot on the pictures above, inside the laptop and the workstation) is a small proxy server that accepts the requests from your browser and passes them to your home Linux server (green path). Linux server accepts these requests and executes them, which means that the requests do not originate from your laptop/workstation, but from the Linux server instead. Since the green path is encrypted, it can not be read by the network equipment in your company or at public location. This means that your browsing is private – unreadable to third parties.
Technically, the communication from your laptop/workstation is directed to a ssh port of your home router, which is then forwarded to your Linux server.
Please note that ssh connection, which goes via port 22 or a port of your choice (if you changed it), may be blocked by the network setup, so this trick may not work, or you may have to change your ssh port to something that is not blocked.
Setup
On Home Linux Server
No special setup is needed on your home Linux server. In the process of your basic setup, you should have enabled ssh on a port of your choice, and forwarded this port from your home router to your Linux server.
On your Linux laptop/workstation
SOCKS server
If you are running Linux on your computer, to start SOCKS server you simply issue the following command in your (non-root) terminal:
ssh -D 1234 -f -C -q -N you@cubie.your-domain.wow -p 22
The authenticity of host '[cubie.your-domain.wow]:22' can't be established.
ECDSA key fingerprint is fd:92:58:16:62:25:68:4a:15:dc:0d:44:70:39:9c:10.
Are you sure you want to continue connecting (yes/no)? yes
you@cubie.your-domain.wow's password:
Please note that you@cubie.your-domain.wow should be replaced with your username and your server’s address, either domain name or IP address. Also, port 22 should be changed to whatever you have set up as your server’s ssh port.
Port number 1234 is a local port number that proxy server will listen on, you may change it if you like, just take care not to collide with other services’s ports in use. Also, remember this number, you will need it in the next step – browser set up.
Finally, three gray lines shown above will only appear on your first ssh proxy start up, on subsequent connections you will only be asked for password.
The option -f means “fork”, i.e. run in the background. If you ommit it, the SOCKS server will hold your terminal while it is running, and you will be able to terminate it with Ctrl-C. If you include -f, SOCKS server will run in the background and leave your terminal free. In this case you can terminate it with kill -9, but first you have to know its PID. Don’t use killall since there may be more ssh processes running.
Example of SOCKS server termination:
ps ux | grep "ssh -D 1234"
debian 1895 ... 13:21 0:00 ssh -D 1234 -f -C -q -N you@cubie.your-domain.wow -p 22
debian 1918 ... 13:24 0:00 grep ssh -D 1234
kill -9 1895
So, you should locate your SOCKS server process, and use its PID in a kill command.
Browser setup
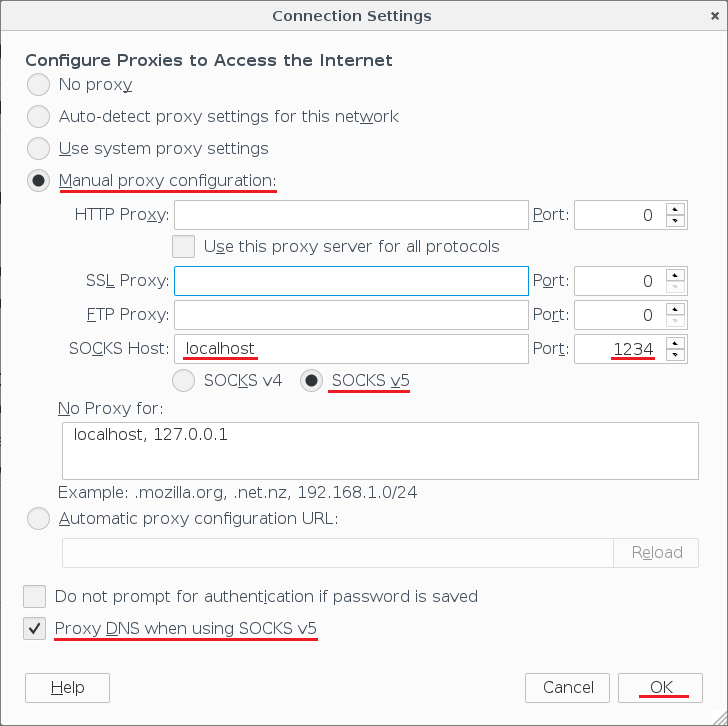
When you have SOCKS server running on your computer, you need to tell your browser to use it. In Firefox you go to Menu → Preferences → Advanced → Network → Connection Settings and there you set it up like this:
On your Windows laptop/workstation
While on Linux you have it already, on Windows you have to download and install some utility to do it.
SOCKS server: PuTTY
If you are working on Windows and you have home Linux server, chances are that you already have PuTTY installed on your windows machine. If that is so, you can use it as SOCKS server. Here is how:
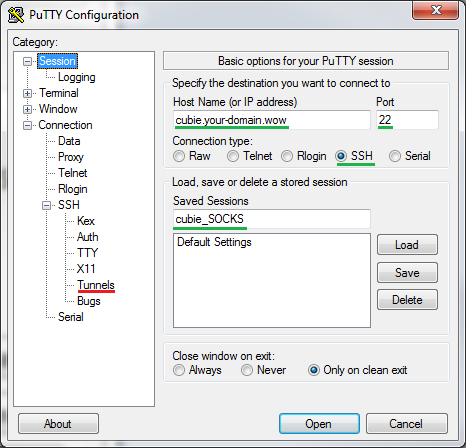
Start PuTTY and type your home Linux server’s name and ssh port, and new connection name (green) and click SSH/Tunnels (red):
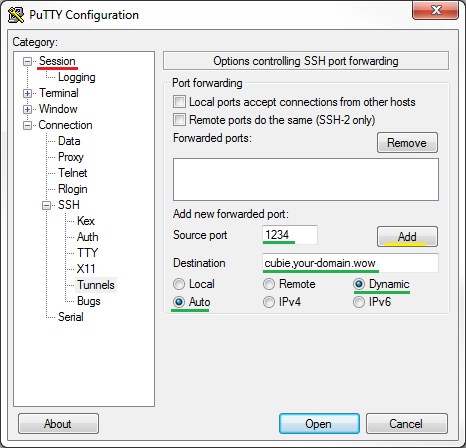
On Tunnels screen type your home Linux server’s name again, local port (e.g. 1234), select Auto and Dynamic (green), then click on Add (yellow) and back to Session (red):
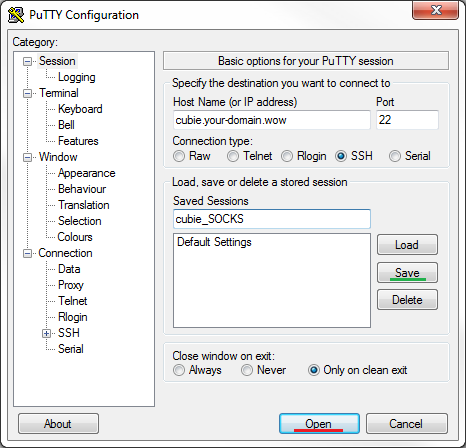
Back in Session screen, click Save (green) and Open (red) to establish the connection and start the proxy server:
You will be prompted for username and password of a non-root user on your home Linux server. If all was set up well, you will get PuTTY terminal session and an SOCKS server listening on selected port (1234 in our example).
It is a bit strange that you have to hang around with an open PuTTY session, but that’s how it works. To terminate the proxy server, you will have to logout from the PuTTY session and close PuTTY.
SOCKS server: MyEnTunnel
Another option, besides PuTTY that is omnipresent while SOCKS server is active, my favorite is MyEnTunnel. There are many locations on the net where it can be picked up from, and many versions.
The latest version seems to be 3.6.1
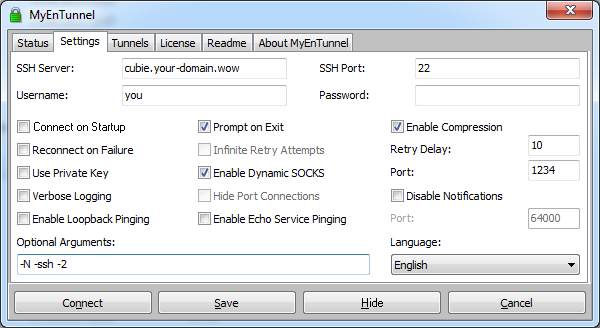
while my personal favorite is 3.4.2
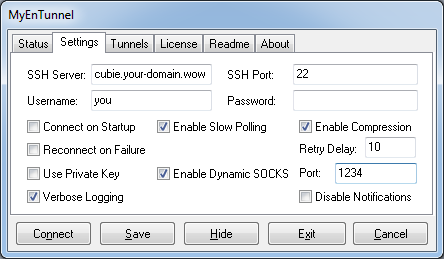
It can be installed via standard set up procedure, or executed as a portable application. Settings can be guessed from the screens above. I don’t recommend saving the password, i.e. you should complete the above setup and click on Save. On each Connect you will be prompted for password.
MyEnTunnel fits itself into the taskbar, so it doesn’t annoy you when minimized, but can easily be connected/disconnected from there:

I find the option “Verbose Logging” very interresting, you will be amazed at the list of connections that it displays when you open only one page of some news portals and similar sites. It should not be always on though, switch it on only when you will read what it displays.
Browser setup
To use the proxy, you have to set up your browser properly. For Firefox you go to Menu → Options → Network Proxy Settings and set it up like the following:

On your Android mobile device
Among many applications out there, the first that worked on my phone was Ki4a. I’m not saying it is the best, or good enough, only that it was the first I found.
On your Mac laptop/workstation or iPhone
Poor man’s blogs don’t talk about Mac or iPhone, due to lack of hands-on experience. Sorry Mac, no offense. Hope to add it in the bright future.