
A small single board computer, like Cubieboard or Raspberry Pi, can be put to a good use as home server.

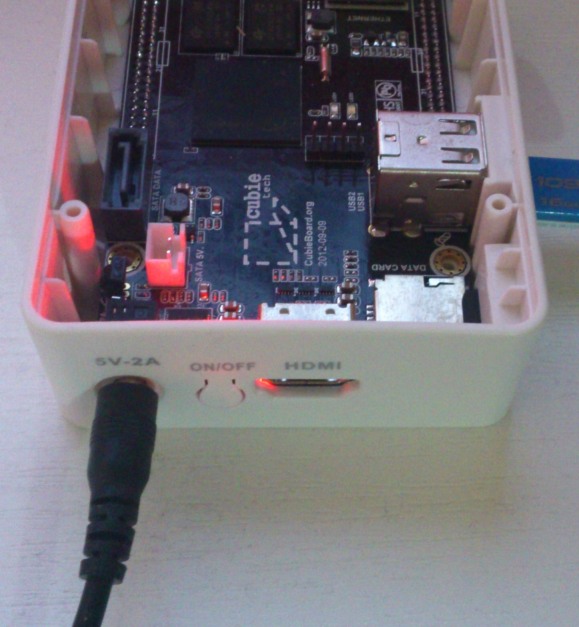
The hardware setup is simple and reliable enough that it can be left to operate even when you are out of your home. It’s only a small box with no moving parts (no hard disk, no cooler fan), powered by a 5V phone charger. Since your home internet gateway (router, modem…) is usually always on, this additional piece of equipment can also be left to work 24×7 with not much risk, provided that you power it with a good charger.
Of course, the risk is all yours. The advice is to avoid no-name chargers and chargers that overheat, and not leave it unattended for long periods of time. Or to quit the whole idea if you are paranoic about fire accidents.
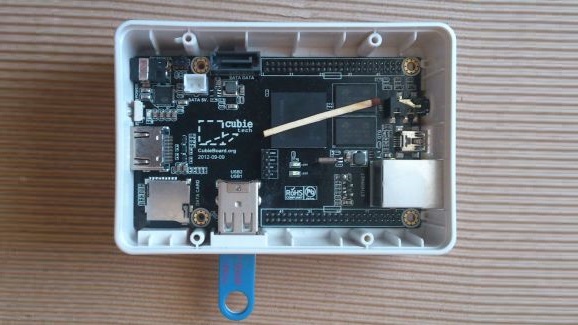
The matchstick on the picture above is not part of the setup, actually it should be kept away from the board. It appears on the picture just to help us understand how big (small) is the board.
What you can do with it?
There is a number of services that can be set up on a small machine, especially if you build on top of Linux operating system. For example:
- Personal mail server, if you want to be independent of the big providers and have your own privacy for your own messages,
- Personal web server, fully equipped with http and https protocols, php/mysql and lot of content:
- WordPress blog
- Web mail
- Public and private file exchange
- Remote video surveillance (with webcam attached)
- Controlled access to your local home network from abroad,
- Private SOCKS proxy which you can use when you are abroad and don’t want to be tracked, or you want to surf “interresting” sites from your office without ending up in company logs,
- Torrent client that is always on,
- Your very own private VPN server,
- “Home automation”, whatever this may mean.
How to set it up?
Hardware setup is simple:
- Single board computer (Cubieboard A10 in my example),
- Phone charger, to power the above,
- MicroSD card as a storage,
- USB flash drive or SATA SSD device as additional storage (optional),
- UTP cable to connect it to the net.
Software setup is also simple:
-
- Pick one of Linux distributions that you find suitable for your board,
- Download the appropriate image and burn it into your MicroSD card,
- Boot the board,
- Set up the board to fit the network, or network to fit the board.
There are various hardware and software variants out there, with various boards, but to me the most interresting is “PC In A Mouse” with Orange Pi Zero, as presented on FossBytes in April 2017.
Armbian Linux
On Cubieboard A10 that was on my dispossal, I found Armbian to be the most appropriate software platform. It is very alive, constantly maintained and very complete Linux distribution, which supports a large number of single board computers (their download page is also a comprehensive list of available single-board hardware platforms).
For my Cubieboard, in December 2017 there were two images:
- Ubuntu desktop – legacy kernel with nice HDMI support, so you can plug it directly into a smart TV, connect the keyboard/mouse and start surfing. I ressisted that temptation because Ubuntu is not my favorite, and I wanted to set up a server machine, not to allocate RAM and some CPU to graphics which I will hardly ever use after initial play.
- Debian server – mainline kernel, which was actually my choice, I downloaded it via torrent.
The downloaded file is usually named Armbian_X.XX_Cubieboard*_X.X.X.7z, a 7zip archive with image file in it, together with the licence, PGP keys and checksum files. You should unpack the archive on your PC and check the img file against the checksum, to make sure you downloaded the authentic one:
sha256sum Armbian_X.XX_Cubieboard*_X.X.X.img
The above command should display the sha256 checksum which is equal to the one provided in the file sha256sum.sha. For non-Linux people, the search terms are “sha256sum windows”, “sha256sum mac”… Also, checking authenticity via gpg is highly recommended, as described on the Getting Started page of Armbian documentation.
I used my Linux PC to burn the img file to MicroSD card, here is how:
dd if=/tmp/Armbian_X.XX_Cubieboard*_X.X.X.img of=/dev/sdX bs=4096
Please note that you have to know which device id your MicroSD card is on, so in /dev/sdX you should use appropriate letter instead of X. On my Linux PC I use lsblk utility to locate the device for the card.
You are again welcome to read the Getting Started page of Armbian documentation for choosing, preparing and burning MicroSD card, as well as for other topics.
After writing the img file, you insert MicroSD card into the board, connect the board to LAN and boot it. It should immediately come to life, with red LED blinking.
After a short while (less than one minute) it should show up on your LAN.
Set up the network
I used my PC to navigate to my router’s setup page (it’s usually http://192.168.0.1) and checked the list of connected devices in LAN/DHCP section. There I found a new machine connected to the router, and picked up its MAC address. For this MAC address I set up the fixed IP address in my router setup, 192.168.0.9 which, from now on, will be my board’s address. You should end up with something like:
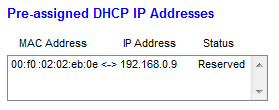
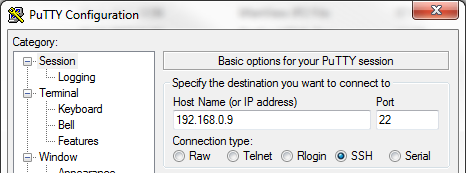
It is important to set a fixed IP address, since the board will act as a server and we don’t want this address changed at router’s will. I had to restart the router, to reload all the settings and reconnect the board with new IP address, and I was then able to connect to the board from my PC. You can use ssh or Putty to connect.
On Armbian the initial password for user “root” is “1234”. You will be forced to change the root password on first login, and then to create a non-privileged user with sudo enabled.
It is adviceable to set a strong root password, and create a non-privileged user with another strong password (different than root password). If you want to be secure, my advice is to keep these two strong passwords in your strong memory (not in your clipboard, handy mail message, SMS or other handy place accessible to hackers from around the world) and type them whenever needed. If this server (from now on we will proudly call it a server) should be accessible from internet – your passwords will be your only protection against hackers. Also, it is wise to change your ssh port (more on this below).
If the network is a notwork
If you can not access the board via network, you should:
- Make sure that you burned the MicroSD image right,
- Make sure that your board actually tries to boot from it,
- Establish communication directly to serial console, and retry.
Disable sudo
Once you have established a stable connection to the board, my advice is to disable sudo for a non-privileged user, but it should be your decision in the end. It may be good to read something about it before deciding.
The config file for sudo is /etc/sudoers, and it has to be edited with the command visudo. So you type visudo as root, and locate the following text:
# Allow members of group sudo to execute any command
%sudo ALL=(ALL:ALL) ALL
there you insert the # sign in front of %sudo ALL=(ALL:ALL) ALL, to look like
# Allow members of group sudo to execute any command
#%sudo ALL=(ALL:ALL) ALL
You then save and exit, which is usually done by typing Ctrl-X and Y.
Initial test
Once you have set up the users and passwords, you should test the setup. For example:
- Log out
- Try to log in as root – should be impossible
- Log in as non-privileged user
- Try
sudo ls -l– should be impossible if you disabled sudo - Become root with
su -and root password
Be warned that doing your ordinary work as root is not adviceable, because root mistakes can lead to damaged Linux installation. This applies to sudo as well, but with sudo you perform one action as root, while with su - you get the root shell which you can enjoy until you type exit or logout.
Further actions
Update your installation
As adviced in Getting Started page, you should update your installation with
apt-get update
apt-get upgrade
Updating and upgrading makes sense even right after the first boot, since Armbian is more frequently updated than the image downloads are created. It should be performed from time to time, of which you will be reminded on further logins to your server.
Change ssh port
Changing ssh port is another thing that you might consider, as it hides the fact that you have a server that can be logged onto. Please also search the net for reasons why you should not do so, as some people think that changing the ssh port is not a good idea. The decision is yours.
It is done by editing the file /etc/ssh/sshd_config and setting a line like Port 99999 inside, instead of the default Port 22. You must be root to be able to do it. You should use a port number of your choice, preferably not assigned to some known service, instead of 99999 which is here as an example. Also, don’t speak it out loud, people should not know about it.
Once you have edited and saved the file, you should reload or restart the ssh daemon to pick up new port number:
/etc/init.d/ssh reload
or
/etc/init.d/ssh restart
Do not rush to log out of your terminal before checking if it works from another terminal. Open another Putty (or whatever ssh client you use) and connect to the server on new port:
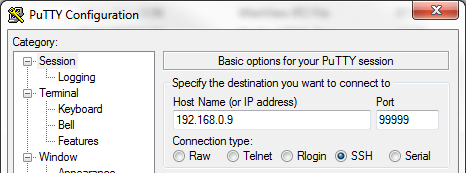
Also, the connection on port 22 should end up with timeout from now on.
So, when you successfully connect to a new port – you are done. But if it does not work – don’t log out of your first session until you sort it out. Common mistake is to leave a comment sign # in front of port definition, or to exit the editor without saving the file. Remember, after changing the file – sshd has to be reloaded or restarted.
You can list the ports that have some services listening on them with
netstat -an | grep LISTEN
It should list something like the following (together with other active ports):
tcp 0 0 0.0.0.0:99999 0.0.0.0:* LISTEN
...
tcp6 0 0 :::99999 :::* LISTEN
with the port you have chosen instead of 99999. If it does not work as expected, ask internet for “change ssh port” and read on.
Open the port on your router
With new ssh port set up, or the default port 22 in place – if you decided so, and the ability to connect to your server from your local PC, you may want to enable ssh access to your server from the outside world. This means that you (and all others who happen to know your public IP address, ssh port, username and password) will be able to connect to your server from any place on the planet which has internet connectivity. Mighty, isn’t it? This is why it’s good to have strong passwords.
To enable this kind of access, you need to know your router’s admin password, and to be able to locate something like “port forwarding” in your router’s setup. It may not be present in the top-level menus, so you may have to dig through the menus. Once you find it, you should set up forwarding for your ssh port, which should look like this:
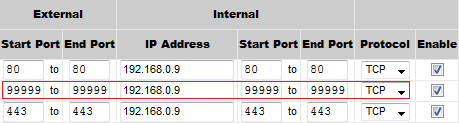
with your chosen ssh port and local IP address of your server.
Once you save this configuration into your router – your server will be available for connections from the outside. You will be able to connect to it, for example, from your work, from your friends computer, from hotel room, etc. Be warned that publicly available machines may have key loggers and other bad things on them, so don’t use the computers that you don’t trust. Otherwise, you are secure, i.e. connecting from your laptop via encrypted public network is OK.
If you want to increase the security level by introducing PKI in your setup, ask internet for “ssh public key setup“.
Domain name setup →
(i.e. how to set up the name of your server on the internet)
Use your server
With the above setup in place, you are safe to say that you have your server that is available on the internet 24×7. Now you should think of what this server will serve. The initial list of possibilities is presented at the beginning of this post, but you should make your own.
Here are some tutorials:
In the future posts we will cover some of the services.