Category Archives: Home Linux

Home Linux server on a single board computer

apt-things tutorial: using apt on Linux

As a proud owner of Linux server, even a small home Linux server runing on Cubieboard or Raspberry, you need to have a basic knowledge of package management. For a given software package, or simply a keyword, you need to be able to:

  • update the list of packages and upgrade your server
  • find out is it installed on your Linux server
  • find out is it available for you to install it
  • install a package
  • uninstall a package
  • list files that an installed package contains
  • list files that a not installed package will install

In this text we will use not one but three packages to practice with, since the above tasks can be performed on a list of packages/keywords, which saves typing and time. So, our three guinea pigs are:

  • apache, web server,
  • php, scripting language which runs either standalone or inside a web server,
  • mysql, database engine which works very well with the above two.

With the above three components installed on your server you can, for example, install and run a WordPress blog on your Linux server.

Update the list of packages and upgrade your server

Prior to performing actions related to package installation/uninstallation, you should execute

  • apt-get update to refresh the package metadata, and
  • apt-get upgrade to install the latest versions of installed packages.

It is important to do it, since you want to install new packages on top of a fresh system, not outdated.

Are things installed on my server?

A simple command

apt list --installed | grep 'apache\|php\|mysql' | grep '\[installed\]' | cut -d '/' -f 1

or (broken into multiple lines)

apt list --installed \
  | grep 'apache\|php\|mysql' \
  | grep '\[installed\]' \
  | cut -d '/' -f 1

will tell us which of our components are installed, for example

apache2
mysql-server
php5

if we have all three, or a subset of the above.

This was the most complex way to ask, and it provides the shortest answer. If we opt out cut -d '/' -f 1, i.e. “give me only the first of several ‘/’-delimited fields”, we will get a bit more information:

apt list --installed \
  | grep 'apache\|php\|mysql' \
  | grep '\[installed\]'

would yield

apache2/oldstable,oldstable,now 2.4.10-10+deb8u11 armhf [installed]
mysql-server/oldstable,oldstable,now 5.5.58-0+deb8u1 all [installed]
php5/oldstable,oldstable,now 5.6.30+dfsg-0+deb8u1 all [installed]

Here we see the versions and some additional information about packages. Next step would be to remove the [installed] filter:

apt list --installed \
  | grep 'apache\|php\|mysql'

displays quiet a lot:

apache2/oldstable,oldstable,now 2.4.10-10+deb8u11 armhf [installed]
apache2-bin/oldstable,oldstable,now 2.4.10-10+deb8u11 armhf [installed,automatic]
apache2-data/oldstable,oldstable,now 2.4.10-10+deb8u11 all [installed,automatic]
apache2-utils/oldstable,oldstable,now 2.4.10-10+deb8u11 armhf [installed,automatic]
libapache2-mod-php5/oldstable,oldstable,now 5.6.30+dfsg-0+deb8u1 armhf [installed,automatic]
libdbd-mysql-perl/oldstable,oldstable,now 4.028-2+deb8u2 armhf [installed,automatic]
libmysqlclient18/oldstable,oldstable,now 5.5.58-0+deb8u1 armhf [installed,automatic]
mysql-client-5.5/oldstable,oldstable,now 5.5.58-0+deb8u1 armhf [installed,automatic]
mysql-common/oldstable,oldstable,now 5.5.58-0+deb8u1 all [installed,automatic]
mysql-server/oldstable,oldstable,now 5.5.58-0+deb8u1 all [installed]
mysql-server-5.5/oldstable,oldstable,now 5.5.58-0+deb8u1 armhf [installed,automatic]
mysql-server-core-5.5/oldstable,oldstable,now 5.5.58-0+deb8u1 armhf [installed,automatic]
php5/oldstable,oldstable,now 5.6.30+dfsg-0+deb8u1 all [installed]
php5-cli/oldstable,oldstable,now 5.6.30+dfsg-0+deb8u1 armhf [installed,automatic]
php5-common/oldstable,oldstable,now 5.6.30+dfsg-0+deb8u1 armhf [installed,automatic]
php5-json/oldstable,now 1.3.6-1 armhf [installed,automatic]

which gives us the list of all packages that have one of our keywords in the description. While this information may be usefull, we should focus our attention only to [installed], since they are basic packages that we install, others were added as dependencies.

Are things available to install?

If a package is not installed on your system, you would have to know is it available, and what is its exact name. It is not as simple as in the previous section, so we will go one package at a time, not all three together.

On default Armbian installation, as on almost all others, you will have apache2 already installed, so we will here use php and mysql to practice with.

If you already know the names of the packages, which will most ofthen be the case, you simply ask:

apt-cache -q showpkg php5 mysql-server

and get the output which is several pages long, very detailed and difficult to read. It is useful, though, but you are, most probably, not keed to use it, so you may type the following two commands instead:

apt-cache -q showpkg php5 | head -1; \
apt-cache -q showpkg mysql-server | head -1

and get the following

Package: php5
Package: mysql-server

which means that you will be able to install the above packages.

If you don’t know the exact names of the packages, you have to list the available options and decide which one is yours:

apt-cache search -n '^mysql'

will produce some 15 to 20 lines of output, some of which would be

mysql-client - mysql database client (metapackage depending on the latest version)
mysql-client-5.5 - mysql database client binaries
mysql-common - mysql database common files, e.g. /etc/mysql/my.cnf
mysql-server - mysql database server (metapackage depending on the latest version)
mysql-server-5.5 - mysql database server binaries and system database setup
mysql-server-core-5.5 - mysql database server binaries

with the underlined one as proper choice. You choose the most general name, preferably with metapackage in the description. You don’t choose the ones with version numbers since they are not generic, and they will be replaced one day with higher versions.

Similarly, for

apt-cache search -n '^php'

you get over 400 lines, and before you try to locate the right one by hand, you try

apt-cache search -n '^php' | grep metapackage

and luckily you get only one:

php5 - server-side, HTML-embedded scripting language (metapackage)

If the second try does not return a proper package name – you must dig it from the first one by hand. You may also ask internet for a proper package name.

If you can not locate your package with apt-cache, you may have to search the net for “add apt repository” for the solution.

Installing packages

This one is simple, provided that you know the names of packages to be installed:

apt-get install php5 mysql-server

If the packages are already installed on your system – no harm will be done, they may eventually be updated. Otherwise they will be installed.

Along with the packages you selected for installation, their dependencies will be installed automatically, and you may be asked to confirm this before installation begins.

During install, you may have to answer some questions, for example “root password for mysql server” and similar. Please read the questions carefully, and remember what you answered, since you will need it later on.

Uninstalling packages

You uninstall with apt-get purge, for example:

apt-get purge php5 mysql-server

and follow the prompts. You may be reminded to execute apt-get autoremove if needed, to remove packages that are not used by the system any more. Be free to do so.

List files that an installed package contains

If you are interrested where some package installed itself, and which files it generated, you do it with apt-file -F list command. This command is not installed on Linux distributions by default, so you may have to

apt-get install apt-file
apt-file update

to be able to use it.
Be warned that some packages may contain large number of files, so we recommend to count them first. For example:

apt-file -F list apache2 | wc

will tell that there are slightly more than 180 files. You may want to pipe the list to less for pagination and scrolling:

apt-file -F list apache2 | less -S

This list of files may be useful if you don’t know much about the package. For example, the files that were installed in /etc should be configuration files for the package.

Here is the file list for package apt-file, obtained with apt-file -F list apt-file

apt-file: /etc/apt/apt-file.conf
apt-file: /etc/bash_completion.d/apt-file
apt-file: /usr/bin/apt-file
apt-file: /usr/bin/diffindex-download
apt-file: /usr/bin/diffindex-rred
apt-file: /usr/share/apt-file/apt-file-update.update-notifier
apt-file: /usr/share/apt-file/do-apt-file-update
apt-file: /usr/share/apt-file/is-cache-empty
apt-file: /usr/share/doc/apt-file/README
apt-file: /usr/share/doc/apt-file/changelog.gz
apt-file: /usr/share/doc/apt-file/copyright
apt-file: /usr/share/man/man1/apt-file.1.gz
apt-file: /usr/share/man/man1/diffindex-download.1.gz
apt-file: /usr/share/man/man1/diffindex-rred.1.gz

One interresting way to use this list is to make your own copy of the files, if you want to keep them safe. Since you are working on Linux, you do it with one-line script in your terminal:

apt-file -F list apt-file | cut -d ' ' -f 2 | tar cfz ~/backup-apt-file.tgz -T -

which means: take the package file list, remove the package name from the beginning of each line, and feed the result to tar utility to archive these files.

With this you get the file backup-apt-file.tgz in your home directory. To check if the archive is OK, and what’s in it, execute:

file ~/backup-apt-file.tgz
tar ztvf ~/backup-apt-file.tgz

First command should tell that it is gzip compressed data, the second should list the contents of the archive.

List files that a not installed package will install

There is nothing here to be said here, except that apt-file -F list works for both installed and not (yet) installed packages.

To fill up this section with some content, here is an example: package samba is not installed (yet) on my Cubie. I executed

apt list --installed | grep samba

and got no results, i.e. package was not installed, but

apt-file -F list samba | wc

said that the file list contains 172 lines, and

apt-file -F list samba | head -5

returned first five of them:

samba: /etc/cron.daily/samba
samba: /etc/init.d/nmbd
samba: /etc/init.d/samba
samba: /etc/init.d/samba-ad-dc
samba: /etc/init.d/smbd

so we conclude it works.

Your very own private SOCKS proxy on Home Linux Server

With your home Linux server set up, you have established the possibility to log in to your home server from another computer via ssh. If you have opened port forwarding on your home router, for ssh port towards your home Linux server, then you can log in from outside world, i.e. from anywhere on the internet.

This resource offers additional possibilities, one of which is a proxy server, very secure and very reliable, which you can use when you are abroad and you don’t want to be tracked.

Galdget plus+ gallery frame
 
Galdget plus+ gallery image


“You” means:

  • you and your laptop which is connected to some public WiFi, or
  • you and your workstation computer at work, or
  • you and your android phone with any kind of internet connectivity.

“You” also means “only you”, i.e. usage of such proxy server is restricted to those who have username/password on your home Linux server, as well as the knowledge of your home server’s IP address/domain name and ssh port.

Unprotected

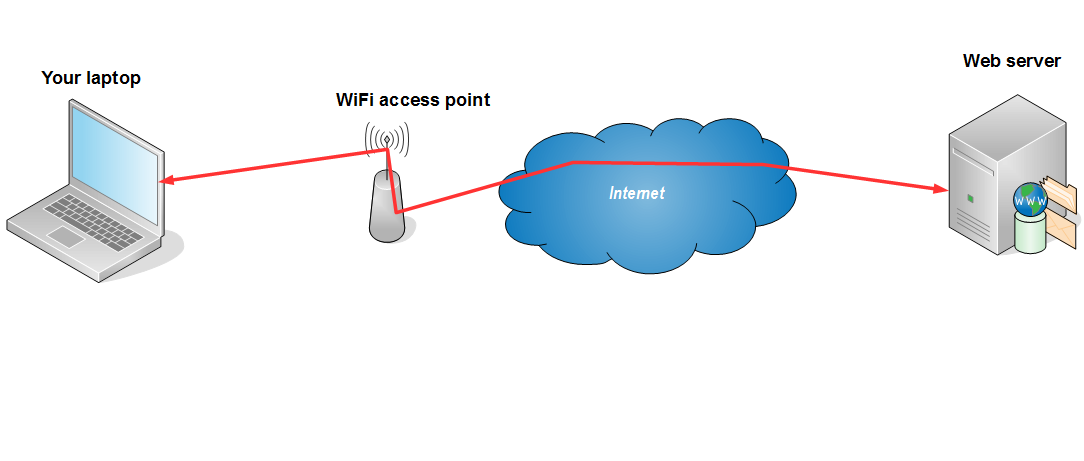
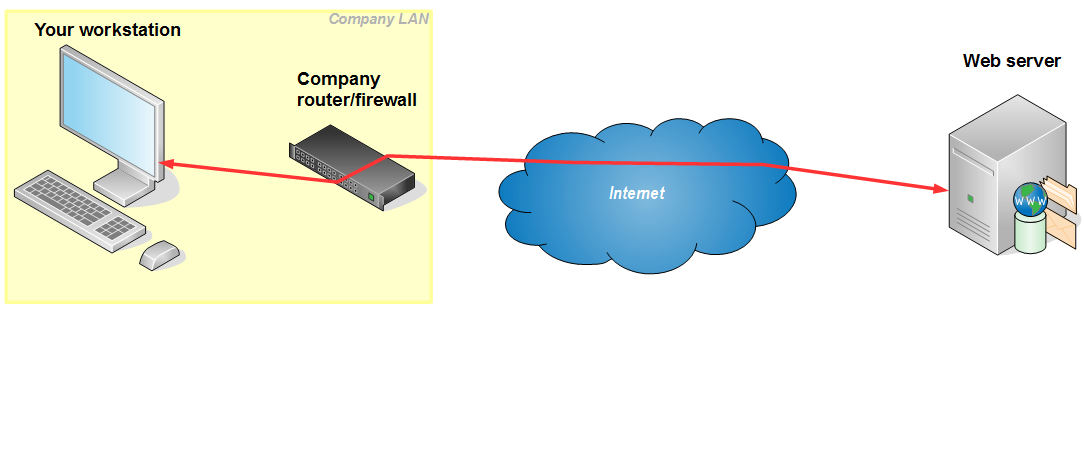
Default (unprotected) layout would look something like one of the two diagrams below:

Public WiFi hotspot
Unprotected WiFi layout

Company network
Unprotected Company LAN layout

Both layouts have the possibility of keeping the record of, for example, the web pages you are visiting via your browser. On a publicly available hotspot logging may occur at WiFi access point or some additional equipment attached to it. Also, if wireless transport goes unencrypted – any computer in the area of the hotspot may spy on you. On your company network logging usually occurrs on router/proxy/firewall equipment. All web traffic that goes through this equipment may be logged, with the workstation address attached to each request, so your network administrators (and consequently – your boss) may have the list of the web pages you are visiting from your workstation. Also, some sites (most ofthen Youtube, Facebook and such) may be blocked by this network equipment.

Protected

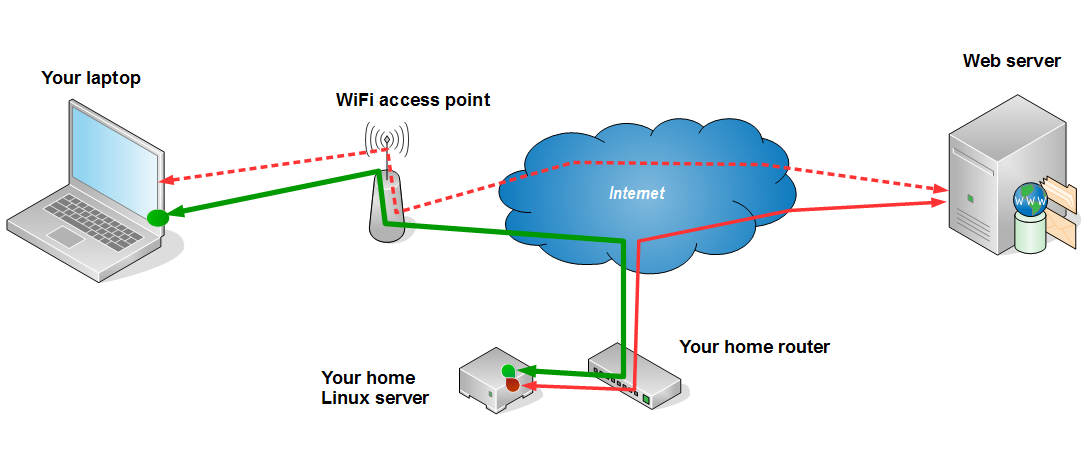
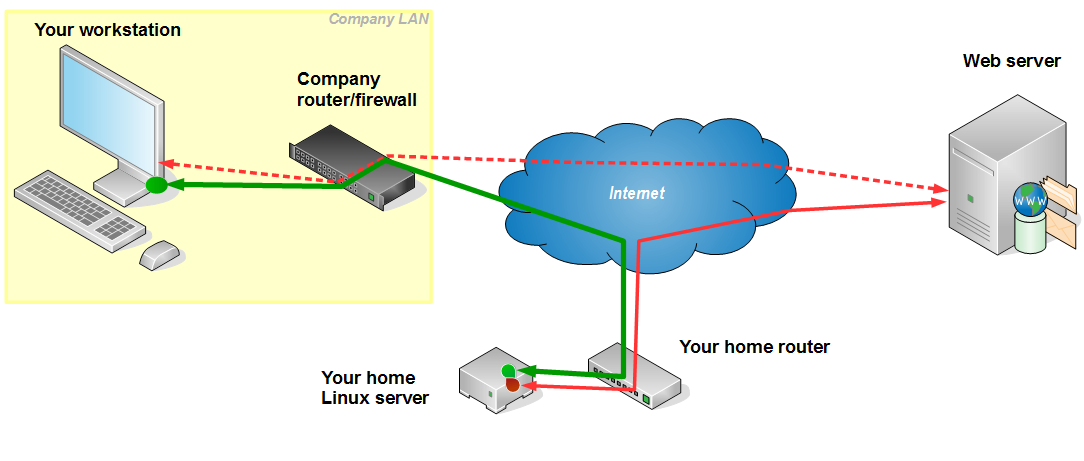
The layout that we are able to establish with SOCKS proxy, via home Linux server, is as follows:

Public WiFi hotspot
Protected WiFi layout

Company network
Protected Company LAN layout

As shown on the layouts above, an encrypted ssh tunnel is established from your home Linux server to your laptop or workstation. Entry point to this tunnel (green dot on the pictures above, inside the laptop and the workstation) is a small proxy server that accepts the requests from your browser and passes them to your home Linux server (green path). Linux server accepts these requests and executes them, which means that the requests do not originate from your laptop/workstation, but from the Linux server instead. Since the green path is encrypted, it can not be read by the network equipment in your company or at public location. This means that your browsing is private – unreadable to third parties.

Technically, the communication from your laptop/workstation is directed to a ssh port of your home router, which is then forwarded to your Linux server.

Please note that ssh connection, which goes via port 22 or a port of your choice (if you changed it), may be blocked by the network setup, so this trick may not work, or you may have to change your ssh port to something that is not blocked.

Setup

On Home Linux Server

No special setup is needed on your home Linux server. In the process of your basic setup, you should have enabled ssh on a port of your choice, and forwarded this port from your home router to your Linux server.

On your Linux laptop/workstation

SOCKS server

If you are running Linux on your computer, to start SOCKS server you simply issue the following command in your (non-root) terminal:

ssh -D 1234 -f -C -q -N you@cubie.your-domain.wow -p 22
The authenticity of host '[cubie.your-domain.wow]:22' can't be established.
ECDSA key fingerprint is fd:92:58:16:62:25:68:4a:15:dc:0d:44:70:39:9c:10.
Are you sure you want to continue connecting (yes/no)? yes
you@cubie.your-domain.wow's password:

Please note that you@cubie.your-domain.wow should be replaced with your username and your server’s address, either domain name or IP address. Also, port 22 should be changed to whatever you have set up as your server’s ssh port.

Port number 1234 is a local port number that proxy server will listen on, you may change it if you like, just take care not to collide with other services’s ports in use. Also, remember this number, you will need it in the next step – browser set up.

Finally, three gray lines shown above will only appear on your first ssh proxy start up, on subsequent connections you will only be asked for password.

The option -f means “fork”, i.e. run in the background. If you ommit it, the SOCKS server will hold your terminal while it is running, and you will be able to terminate it with Ctrl-C. If you include -f, SOCKS server will run in the background and leave your terminal free. In this case you can terminate it with kill -9, but first you have to know its PID. Don’t use killall since there may be more ssh processes running.

Example of SOCKS server termination:

ps ux | grep "ssh -D 1234"
debian 1895 ... 13:21 0:00 ssh -D 1234 -f -C -q -N you@cubie.your-domain.wow -p 22
debian 1918 ... 13:24 0:00 grep ssh -D 1234
kill -9 1895

So, you should locate your SOCKS server process, and use its PID in a kill command.

Browser setup

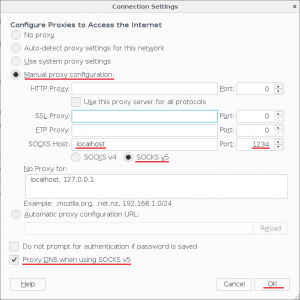
When you have SOCKS server running on your computer, you need to tell your browser to use it. In Firefox you go to Menu → Preferences → Advanced → Network → Connection Settings and there you set it up like this:

On your Windows laptop/workstation

While on Linux you have it already, on Windows you have to download and install some utility to do it.

SOCKS server: PuTTY

If you are working on Windows and you have home Linux server, chances are that you already have PuTTY installed on your windows machine. If that is so, you can use it as SOCKS server. Here is how:

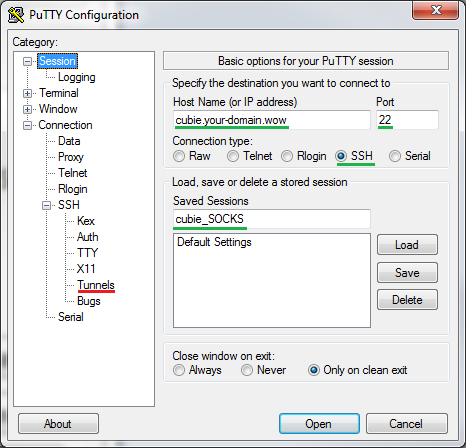
Start PuTTY and type your home Linux server’s name and ssh port, and new connection name (green) and click SSH/Tunnels (red):

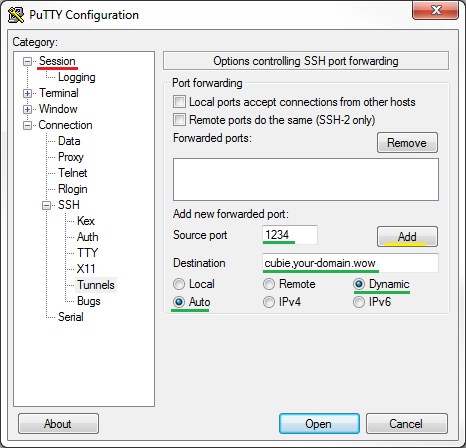
On Tunnels screen type your home Linux server’s name again, local port (e.g. 1234), select Auto and Dynamic (green), then click on Add (yellow) and back to Session (red):

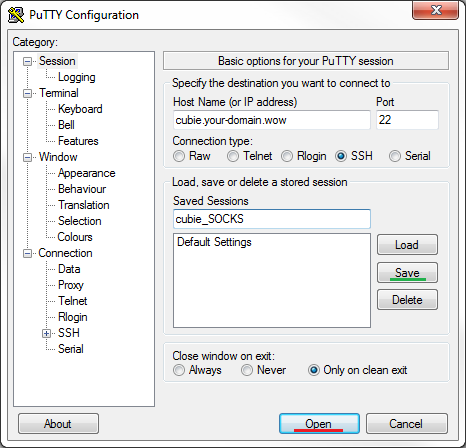
Back in Session screen, click Save (green) and Open (red) to establish the connection and start the proxy server:

You will be prompted for username and password of a non-root user on your home Linux server. If all was set up well, you will get PuTTY terminal session and an SOCKS server listening on selected port (1234 in our example).

It is a bit strange that you have to hang around with an open PuTTY session, but that’s how it works. To terminate the proxy server, you will have to logout from the PuTTY session and close PuTTY.

SOCKS server: MyEnTunnel

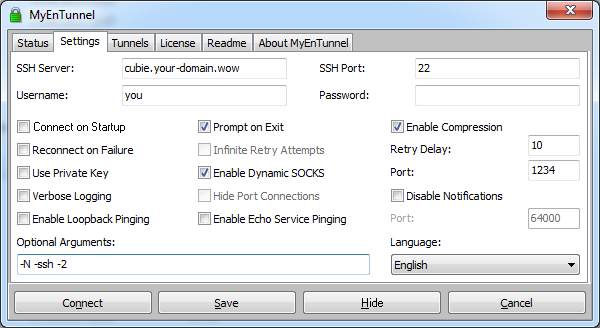
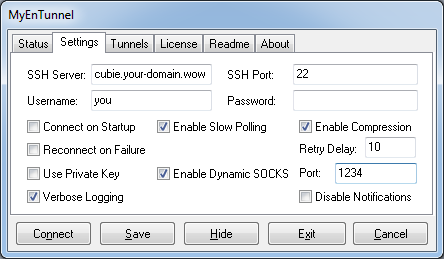
Another option, besides PuTTY that is omnipresent while SOCKS server is active, my favorite is MyEnTunnel. There are many locations on the net where it can be picked up from, and many versions.

The latest version seems to be 3.6.1

while my personal favorite is 3.4.2

It can be installed via standard set up procedure, or executed as a portable application. Settings can be guessed from the screens above. I don’t recommend saving the password, i.e. you should complete the above setup and click on Save. On each Connect you will be prompted for password.

MyEnTunnel fits itself into the taskbar, so it doesn’t annoy you when minimized, but can easily be connected/disconnected from there:

I find the option “Verbose Logging” very interresting, you will be amazed at the list of connections that it displays when you open only one page of some news portals and similar sites. It should not be always on though, switch it on only when you will read what it displays.

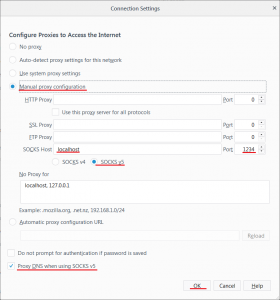
Browser setup

To use the proxy, you have to set up your browser properly. For Firefox you go to Menu → Options → Network Proxy Settings and set it up like the following:

On your Android mobile device

Among many applications out there, the first that worked on my phone was Ki4a. I’m not saying it is the best, or good enough, only that it was the first I found.

On your Mac laptop/workstation or iPhone

Poor man’s blogs don’t talk about Mac or iPhone, due to lack of hands-on experience. Sorry Mac, no offense. Hope to add it in the bright future.


Domain name setup for your home Linux server

You have set your home Linux server on a small single board computer, Raspberry or Cubieboard or similar, and now you want to make use of it. Since it can be left to operate 24×7, you want to use it from the outside world, i.e. when you are not at home. Or you want to set up some services for other people to use.

Since it is on your home LAN, you have to access it via public IP address of your router, which is not permanent and, even if you make it permanent, it is not nice. You don’t want to call your server https://421.321.221.121, you want to call it https://cubie.myveryowndomain.wow or similar. I, unforget.rs, would want to call it https://cubie.unforget.rs, if I had one.

Static IP address

First thing that should be considered here is static IP address. Your home router’s public IP address is volatile, your internet provider may change it at its own will, more or less frequently and – without your possible influence on it.

So you may want to ask your internet provider is it possible to set up a static IP address for you, and for how much money (it is not free). With static IP address you can make a permanent nameserver setup and, which is also important, if you plan to have your own private mail server – it will have better “blacklist rating” if it resides on a static IP address. Many mail servers, especially the big ones, refuse to receive mail from mail servers with dynamic IP addresses, knowing that they may be used by spammers.

However, static IP address is not mandatory. Depending on your needs, you may live happily with the dynamic one.

Domain name administration

Free domains, usually for dynamic IP

With dynamic IP address and dynamic funds (no money), you may want to try some of available free options. This would also work for static IP address. For example, no-ip offers free subdomains in the form of yourdomain.hopto.org, yourdomain.ddns.net and similar (replace yourdomain with your preference), and there are many more out there. Just ask internet for “dynamic IP dns”.

Purchase your own domain

With static IP, you may want to register your own domain for a small annual fee. Internet search for “domain name registration” will yield an endless list of possibilities, and once you opt for one of them and walk through the procedure, you will be given access to a control panel where you can administer your domain, i.e. enter your static IP address and link it to your domain name. More detail on that below.

This will also work for dynamic IP address, but you will have to update your domain name setup each time your IP address changes, and each time it will take some time to propagate this change throughout the internet (default is up to 12 hours). Your server will be unreachable in that period and, which is even worse, someone else’s router which got your old IP address will respond to requests to your domain name. Bad!

You already have a domain

If you already have a registered domain, you should have access to a control panel to administer it. You are ready for the setup, and DNS record administration is what you are after, somewhere in the control panel’s menus.

  • If your new static (or, alas, dynamic) IP address is the only one you have, you will most probably simply attach it to your domain.
  • If you already have a server on your main domain, you will register your home server as a subdomain.

In either case, you will have to add a new address (A) record to your DNS records table, something like the first entry on the picture below:

Here is the overview of the first entry:

  • cubie.some-domain.wow is the name of your home server, in this case as subdomain of the domain some-domain.wow,
  • A is the record type, meaning that you are assigning an address to the above name,
  • 421.321.221.121 is your router’s public IP address, hopefully static, which you are hereby assigning to the above name,
  • 43200 is this record’s “time to live”, i.e. for how long other machines on the internet will keep this information in their memory before asking for it again (43200 seconds is 12 hours).

The default TTL of 43200 seconds is standard DNS setup, you can set the smaller value, but not small enough to catch up with changing of dynamic IP addresses. Remember that DNS administrator don’t like small values, as they increase network traffic, so lower limmit may apply on this number.

With this entry in place, you can call your home server a cubie.some-domain.wow, or maybe a some-domain.wow if you have only this server, and you set it up accordingly in DNS setup. Whis would be enough to run a web server, access it via ssh and many other things.

If you want to run a mail server on your home Linux server, you need to set up something like the second entry on the picture above. Here is the overview:

  • some-domain.wow is the mail domain for which you are registering the mail server, i.e. for mail addresses like person.name@some-domain.wow,
  • MX is the record type, meaning that you are describing a mail server here,
  • 10 cubie.some-domain.wow is actually two entries displayed together:
    • 10 is a preference, technically you may have more than one server with different preferences,
    • cubie.some-domain.wow is the server name,
  • 43200 is this record’s “time to live”, as already said above.

With such MX record in place, you can set up the mail server on your home Linux server, and other mail servers on the internet will know where to find it.

Talking to Cubieboard via serial cable

While setting up your home Linux server, you may need to talk to it via serial port, since this is the most basic means of communication, the one that always works.

My Cubieboard A10 arrived with a serial cable, which is actually USB to RS232 converter with TTL pins instead of a regular RS232 connector at the other end. It fits almost nicely into the Cubieboard, but beware:

do not connect the red wire to the board!!!

It brings 5V from USB into the board’s power line, which is 3.3V, so you may burn the board if you connect this wire. No smoke, explosions or other audio-visual effects are likely to occurr if you connect it, since the board is made of high quality “internal combustion” electronic components, but it would, never the less, be dead.

So don’t connect the red wire!

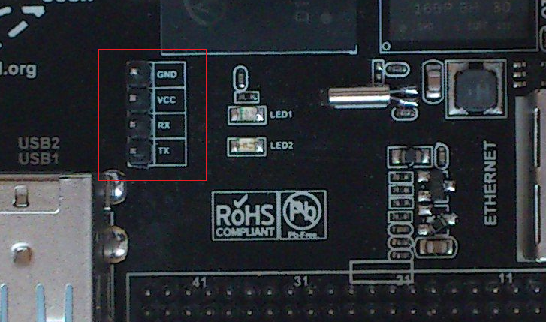
The wires are as follows:

  • Black: GND, should be connected first
  • Green: RX, connect to RX pin of Cubieboard
  • White: TX, connect to TX pin of Cubieboard
  • Red: 5V, DO NOT CONNECT

And here is what the pins on the board look like:

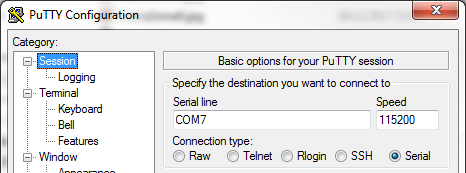
I was using the serial cable to communicate with the board when I was first installing Linux on it, to perform initial setup of the network. When connected to a PC, it gets detected as a serial interface, something like COM7 under Windows or /dev/ttyS6 on Linux (port numbers will be different on your machine), with 115200 bits per second, no parity or flow control, or shortly 115kN81.

After connecting the pins to the board (with the board switched off) you connect the USB end into your PC, wait for the serial port to be detected, and then start your favorite terminal program, for example Putty, and connect to the port.

With MicroSD card loaded with Linux and inserted into the board, after powering up the board you will see the console messages scrolling in the terminal, and eventually the login prompt will show up. If you are setting up Armbian, you should log in as root, with 1234 as password, and pass initial procedure of changing root password and adding a non-privileged user.

Then you check the network, with ifconfig, netstat and such, see (or assign) the board’s IP address, and try to connect to it via LAN from another terminal window.

If you want to have a fixed IP address for the board, you can set it up as described in Getting Started page, or you can do it in your router setup without changing the Armbian default network setup.

When you set up the network, reboot and succeed in connecting to the board via LAN, you will not need the serial connection any more. You should keep the cable handy anyway, and remember to not use the red wire (if you did not cut it already, or covered it with adhesive tape).

Home Linux server with Cubieboard, Raspberry Pi or similar

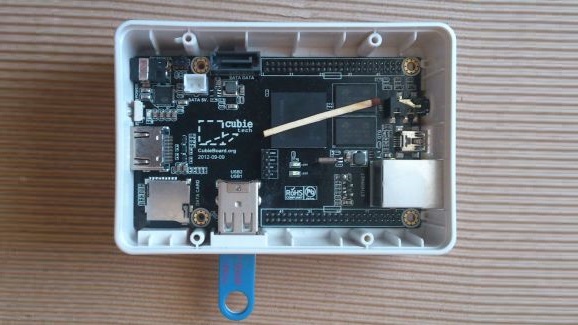
A small single board computer, like Cubieboard or Raspberry Pi, can be put to a good use as home server.

Galdget plus+ gallery frame
 
Galdget plus+ gallery image

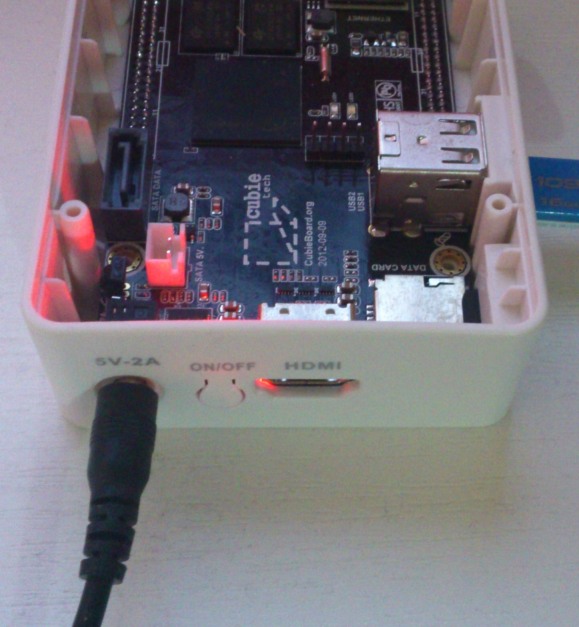
The hardware setup is simple and reliable enough that it can be left to operate even when you are out of your home. It’s only a small box with no moving parts (no hard disk, no cooler fan), powered by a 5V phone charger. Since your home internet gateway (router, modem…) is usually always on, this additional piece of equipment can also be left to work 24×7 with not much risk, provided that you power it with a good charger.

Of course, the risk is all yours. The advice is to avoid no-name chargers and chargers that overheat, and not leave it unattended for long periods of time. Or to quit the whole idea if you are paranoic about fire accidents.

The matchstick on the picture above is not part of the setup, actually it should be kept away from the board. It appears on the picture just to help us understand how big (small) is the board.

What you can do with it?

There is a number of services that can be set up on a small machine, especially if you build on top of Linux operating system. For example:

  • Personal mail server, if you want to be independent of the big providers and have your own privacy for your own messages,
  • Personal web server, fully equipped with http and https protocols, php/mysql and lot of content:
    • WordPress blog
    • Web mail
    • Public and private file exchange
    • Remote video surveillance (with webcam attached)
  • Controlled access to your local home network from abroad,
  • Private SOCKS proxy which you can use when you are abroad and don’t want to be tracked, or you want to surf “interresting” sites from your office without ending up in company logs,
  • Torrent client that is always on,
  • Your very own private VPN server,
  • “Home automation”, whatever this may mean.

How to set it up?

Hardware setup is simple:

  • Single board computer (Cubieboard A10 in my example),
  • Phone charger, to power the above,
  • MicroSD card as a storage,
  • USB flash drive or SATA SSD device as additional storage (optional),
  • UTP cable to connect it to the net.

Software setup is also simple:

    • Pick one of Linux distributions that you find suitable for your board,
    • Download the appropriate image and burn it into your MicroSD card,
    • Boot the board,
    • Set up the board to fit the network, or network to fit the board.

There are various hardware and software variants out there, with various boards, but to me the most interresting is “PC In A Mouse” with Orange Pi Zero, as presented on FossBytes in April 2017.

Armbian Linux

On Cubieboard A10 that was on my dispossal, I found Armbian to be the most appropriate software platform. It is very alive, constantly maintained and very complete Linux distribution, which supports a large number of single board computers (their download page is also a comprehensive list of available single-board hardware platforms).

For my Cubieboard, in December 2017 there were two images:

  • Ubuntu desktop – legacy kernel with nice HDMI support, so you can plug it directly into a smart TV, connect the keyboard/mouse and start surfing. I ressisted that temptation because Ubuntu is not my favorite, and I wanted to set up a server machine, not to allocate RAM and some CPU to graphics which I will hardly ever use after initial play.
  • Debian server – mainline kernel, which was actually my choice, I downloaded it via torrent.

The downloaded file is usually named Armbian_X.XX_Cubieboard*_X.X.X.7z, a 7zip archive with image file in it, together with the licence, PGP keys and checksum files. You should unpack the archive on your PC and check the img file against the checksum, to make sure you downloaded the authentic one:

sha256sum Armbian_X.XX_Cubieboard*_X.X.X.img

The above command should display the sha256 checksum which is equal to the one provided in the file sha256sum.sha. For non-Linux people, the search terms are “sha256sum windows”, “sha256sum mac”… Also, checking authenticity via gpg is highly recommended, as described on the Getting Started page of Armbian documentation.

I used my Linux PC to burn the img file to MicroSD card, here is how:

dd if=/tmp/Armbian_X.XX_Cubieboard*_X.X.X.img of=/dev/sdX bs=4096

Please note that you have to know which device id your MicroSD card is on, so in /dev/sdX you should use appropriate letter instead of X. On my Linux PC I use lsblk utility to locate the device for the card.

You are again welcome to read the Getting Started page of Armbian documentation for choosing, preparing and burning MicroSD card, as well as for other topics.

After writing the img file, you insert MicroSD card into the board, connect the board to LAN and boot it. It should immediately come to life, with red LED blinking.

After a short while (less than one minute) it should show up on your LAN.

Set up the network

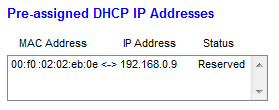
I used my PC to navigate to my router’s setup page (it’s usually http://192.168.0.1) and checked the list of connected devices in LAN/DHCP section. There I found a new machine connected to the router, and picked up its MAC address. For this MAC address I set up the fixed IP address in my router setup, 192.168.0.9 which, from now on, will be my board’s address. You should end up with something like:

It is important to set a fixed IP address, since the board will act as a server and we don’t want this address changed at router’s will. I had to restart the router, to reload all the settings and reconnect the board with new IP address, and I was then able to connect to the board from my PC. You can use ssh or Putty to connect.

On Armbian the initial password for user “root” is “1234”. You will be forced to change the root password on first login, and then to create a non-privileged user with sudo enabled.

It is adviceable to set a strong root password, and create a non-privileged user with another strong password (different than root password). If you want to be secure, my advice is to keep these two strong passwords in your strong memory (not in your clipboard, handy mail message, SMS or other handy place accessible to hackers from around the world) and type them whenever needed. If this server (from now on we will proudly call it a server) should be accessible from internet – your passwords will be your only protection against hackers. Also, it is wise to change your ssh port (more on this below).

If the network is a notwork

If you can not access the board via network, you should:

  1. Make sure that you burned the MicroSD image right,
  2. Make sure that your board actually tries to boot from it,
  3. Establish communication directly to serial console, and retry.

Disable sudo

Once you have established a stable connection to the board, my advice is to disable sudo for a non-privileged user, but it should be your decision in the end. It may be good to read something about it before deciding.

The config file for sudo is /etc/sudoers, and it has to be edited with the command visudo. So you type visudo as root, and locate the following text:

# Allow members of group sudo to execute any command
%sudo ALL=(ALL:ALL) ALL

there you insert the # sign in front of %sudo ALL=(ALL:ALL) ALL, to look like

# Allow members of group sudo to execute any command
#%sudo ALL=(ALL:ALL) ALL

You then save and exit, which is usually done by typing Ctrl-X and Y.

Initial test

Once you have set up the users and passwords, you should test the setup. For example:

  1. Log out
  2. Try to log in as root – should be impossible
  3. Log in as non-privileged user
  4. Try sudo ls -l – should be impossible if you disabled sudo
  5. Become root with su - and root password

Be warned that doing your ordinary work as root is not adviceable, because root mistakes can lead to damaged Linux installation. This applies to sudo as well, but with sudo you perform one action as root, while with su - you get the root shell which you can enjoy until you type exit or logout.

Further actions

Update your installation

As adviced in Getting Started page, you should update your installation with

apt-get update
apt-get upgrade

Updating and upgrading makes sense even right after the first boot, since Armbian is more frequently updated than the image downloads are created. It should be performed from time to time, of which you will be reminded on further logins to your server.

Change ssh port

Changing ssh port is another thing that you might consider, as it hides the fact that you have a server that can be logged onto. Please also search the net for reasons why you should not do so, as some people think that changing the ssh port is not a good idea. The decision is yours.

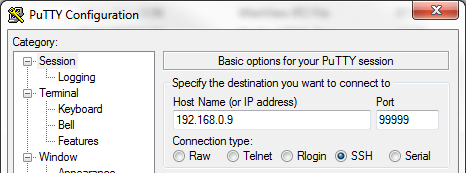
It is done by editing the file /etc/ssh/sshd_config and setting a line like Port 99999 inside, instead of the default Port 22. You must be root to be able to do it. You should use a port number of your choice, preferably not assigned to some known service, instead of 99999 which is here as an example. Also, don’t speak it out loud, people should not know about it.

Once you have edited and saved the file, you should reload or restart the ssh daemon to pick up new port number:

/etc/init.d/ssh reload

or

/etc/init.d/ssh restart

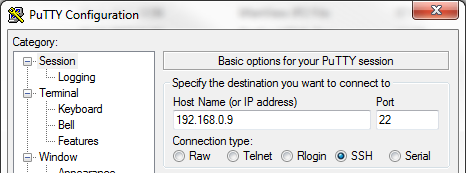
Do not rush to log out of your terminal before checking if it works from another terminal. Open another Putty (or whatever ssh client you use) and connect to the server on new port:

Also, the connection on port 22 should end up with timeout from now on.

So, when you successfully connect to a new port – you are done. But if it does not work – don’t log out of your first session until you sort it out. Common mistake is to leave a comment sign # in front of port definition, or to exit the editor without saving the file. Remember, after changing the file – sshd has to be reloaded or restarted.

You can list the ports that have some services listening on them with

netstat -an | grep LISTEN

It should list something like the following (together with other active ports):

tcp 0 0 0.0.0.0:99999 0.0.0.0:* LISTEN
...
tcp6 0 0 :::99999 :::* LISTEN

with the port you have chosen instead of 99999. If it does not work as expected, ask internet for “change ssh port” and read on.

Open the port on your router

With new ssh port set up, or the default port 22 in place – if you decided so, and the ability to connect to your server from your local PC, you may want to enable ssh access to your server from the outside world. This means that you (and all others who happen to know your public IP address, ssh port, username and password) will be able to connect to your server from any place on the planet which has internet connectivity. Mighty, isn’t it? This is why it’s good to have strong passwords.

To enable this kind of access, you need to know your router’s admin password, and to be able to locate something like “port forwarding” in your router’s setup. It may not be present in the top-level menus, so you may have to dig through the menus. Once you find it, you should set up forwarding for your ssh port, which should look like this:

with your chosen ssh port and local IP address of your server.

Once you save this configuration into your router – your server will be available for connections from the outside. You will be able to connect to it, for example, from your work, from your friends computer, from hotel room, etc. Be warned that publicly available machines may have key loggers and other bad things on them, so don’t use the computers that you don’t trust. Otherwise, you are secure, i.e. connecting from your laptop via encrypted public network is OK.

If you want to increase the security level by introducing PKI in your setup, ask internet for “ssh public key setup“.

Domain name setup →

(i.e. how to set up the name of your server on the internet)

Use your server

With the above setup in place, you are safe to say that you have your server that is available on the internet 24×7. Now you should think of what this server will serve. The initial list of possibilities is presented at the beginning of this post, but you should make your own.

Here are some tutorials:

In the future posts we will cover some of the services.